If you have a Saturn S-Series that was made before mid 2001, you should probably replace the ECTS in your car as a preventative measure. Before that year, Saturn used a resin-tipped ECTS, then they switched to a brass-tipped one. The resin tip will inevitably split, and the sensor will go bad, and may even allow some small amounts of coolant leakage, causing corrosion on the wiring harness for the ECTS. For a $10-20 part, and to avoid all the problems that come with a bad ECTS, it is worth replacing, and it’s easy.
*’91-’95 owners* You have two temperature sensors in the area. The two-wire one is the ECTS that sends to the PCM. The other sends to your instrument cluster.
The ECTS is a thermistor – that is, it’s a resistor that changes resistance with temperature. The resistance level tells the PCM the coolant temperature. The ECTS and the IAT (Intake Air Temperature) are the same part.
This is a good thing to do while you’re at it if you need to replace your thermostat, or anything else that drains the coolant. You do not, however, need to drain the coolant to replace the ECTS.
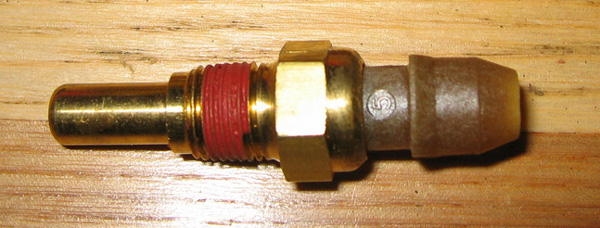
<< sensor end wiring connector end >>
Relevant Models
All S-Series
Tools
8mm, 13mm sockets & ratchet
Needle nose pliers (angled tip if you have them)
Rag (don’t worry, you won’t have to use it much at all if you follow directions)
Parts
New ECTS (brass-tipped. You can get this at the dealer, or a parts store. Some parts stores still have the resin-tipped ECTS, so look before you buy)
New ECTS wiring connector (Optional) Sometimes a bad ECTS allows coolant onto the connector, causing corrosion. If this happens, you need a new connector. If not, you probably don’t. If a place stocks one near your house, might wait. If it’s going to be a show stopper and keep you from getting to work, you might go ahead & get it, and either replace it whether or not it needs it, or return the part if you don’t need it.
If you have trouble finding the connector, you can pull the pigtale for the intake temp sensor from a salvage yard vehicle. It’s the same connector, but doesn’t get the exposure to moisture that the ECTS connector can, so they’re usually fine.
Preparation
Necessary:
Let the car sit until the engine is COLD. Not cool, cold. Overnight cold. If it’s warmed up at all, you will lose a lot more coolant.
Disconnect the negative battery cable.
Helpful:
Jack up the driver’s side of the car.This will help reduce coolant loss.
Remove the battery.You have to remove the negative battery cable anyway, and this will give you extra working space. Requires the 8mm socket.
Remove the coolant reservoir cap, then put it back on. This relieves pressure on the coolant system so when you pull the ECTS, the pressure doesn’t push more coolant out. Putting the cap back on helps hold the coolant in.
Step 3
Remove the wiring connector from the ECTS. If you have needle-nose pliers with an angled tip, those work really well, but any needle nose pliers will work, or possibly even your hands. Squeeze on the two sides to release the connector. The connector locks in place, so don’t pull on the wires – it will only hurt things.
Step 4
Inspect the wiring harness. If it has any corrosion, replace it.
Step 5
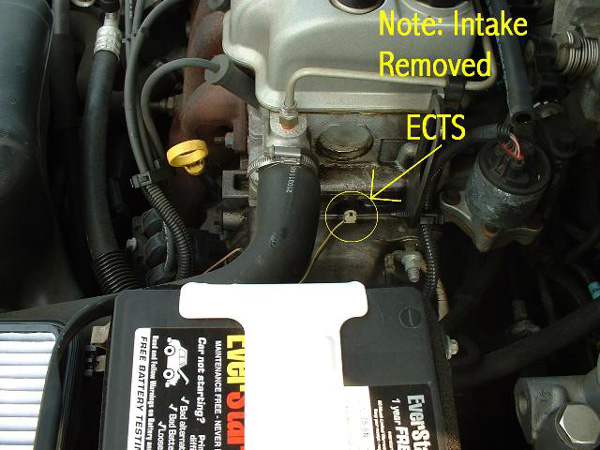
Remove the ECTS. Use the 13mm socket, and rotate counter-clockwise (normal thread). A little bit of coolant will come out (not even a spoon-full when I did it). Have a rag and the new sensor ready.
Step 6
Quickly but carefully, put the new sensor in. Don’t over tighten, it doesn’t take a lot of force. (I’ll try to find the torque standard for it and add it here.)
Step 7
Reassemble. Snap the wiring connector back on the ECTS, put back on everything else. You’re done!