Replace the torque axis mount (TAM) (’92-’02 S-Series)
Author: Jonathan Swain (aka "PurdueGuy")
Intro
This is also commonly known as the upper engine mount, or is often listed in parts catalogs as just “engine mount”. It is good to know that there are 2 types of engine mounts. This one, and a “dogbone” style. The car (whether SOHC or DOHC) uses 1 TAM and 2 dogbones.
*NOTE* It is my understanding that the ’91 SOHC engines do not have this mount.
How to tell if you need a new TAM:
You need a new TAM if:
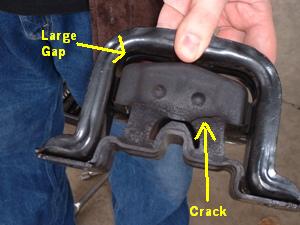
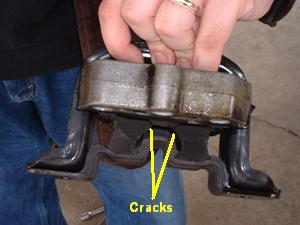
You see any cracks in the rubber of the TAM, or have rubber separating from the rest of the assembly
You can fit your finger between the rubber and the top metal of the TAM
Relevant Models
All 1992-2002 S-Series
Tools
PB Blaster or other lubricant (how badly, and even if you’ll need this may vary)
15mm deep socket
Breaker bar (or ratchet & cheater pipe)
Socket extension (6″ probably best)
Torque wrench (not 100% necessary, but recommended)
Jack
Piece of wood or substitute (cushion between jack & oil pan)
Parts
New TAM (about $40 from local parts store, or about $70 from the dealer)
New TAM bolts & nuts (may not be needed, should be returnable – check first)
Removal
Step 1
Spray the nuts/bolts with the PB Blaster or other lubricant and let sit. You could do this the night before, or a few hours before you work. It will make your life easier to prep the bolts this way.
Step 2
Park the car & make sure it’s secure. You won’t be lifting the car off the ground, so if you’re on level ground, setting the emergency brake should be sufficient.
Step 3
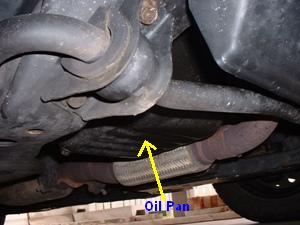
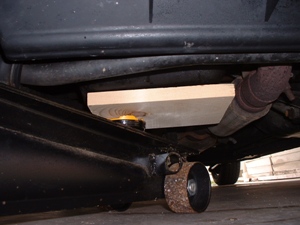
Lift the engine slightly with the jack. Put a piece of wood or something else between the jack and the oil pan. It’s best to put the lifting face of the jack close to one side of the oil pan so the vertical side of the oil pan can hold things and help prevent any denting of the pan. For now, you just need the jack to hold the engine and take pressure off the mount, so jack up just a bit after you start to see the engine or car rise with the jack.
*NOTE* I have a fairly long SUV jack, and was able to get it under the oil pan while still being able to operate the jack. Smaller jacks may not be able to do this, so you may have to lift the vehicle some to get under the engine far enough.
Step 4
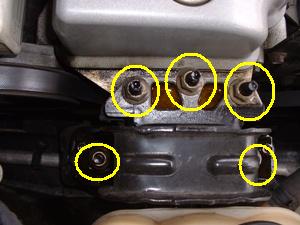
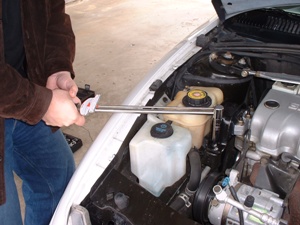
Remove the nuts. There are 5 nuts to remove. If things go nicely, you just remove them. There is a chance, though, that the nuts may be stuck to the bolts that go into the engine block. If this happens, you are likely to unscrew the bolt from the block. This isn’t a big deal, just take your time and don’t damage the soft aluminum block. Use your extension to get the nut on the back side of the TAM.
Step 5
Remove the old TAM. If you’re lucky, it will lift right off with no problems. Otherwise, you may have to carefully pry it off. Also, you may be able to loosen it by carefully raising or lowering the engine slightly.
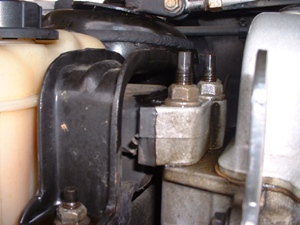
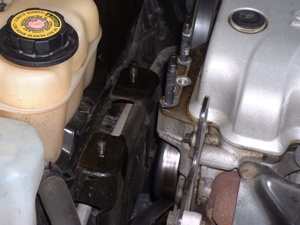
Pic: TAM removed. You can see that one of my bolts came out of the block.
Installation
Step 1
Put the new TAM in place. If you have troubles getting it on, you’ll likely need to raise or lower the engine slightly so that everything lines up. You may also have to gently pull the engine toward the TAM location.
Step 2
Put the nuts/bolts back on. Start them with your fingers, ESPECIALLY if you have to screw bolts back in. You do not want to cross-thread the bolt into the aluminum block and damage the block! Once you’ve got them in fairly far, tighten them up. They do not need to be super-tight, but fairly tight. If you have a torque wrench, tighten the 5 nuts to 37 ft/lbs.
Step 3
Remove the jack – you’re done. I’d lower the jack slowly, in case you screwed something up!